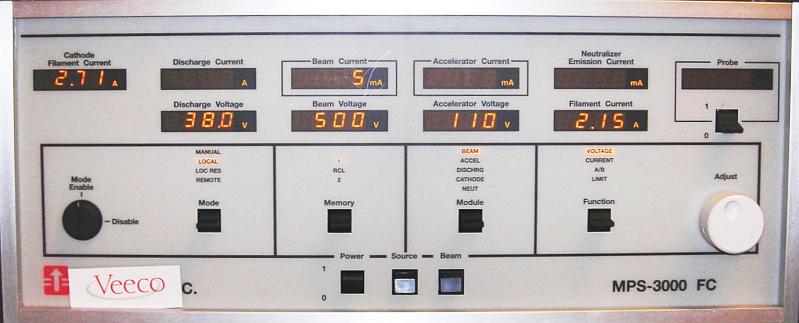
3 cm Ion Source
Short Web-Manual (for
detailed instructions, see the
manufacturer’s manual)

Front panel of the
power-supply for the ion-source

Front panel of the
power-supply for the flow-controller
-
Load the sample and
rotate the transfer rod to 270° so that the sample will face away
from the ion-source.
-
Switch on the
power-supply for the flow-controller. It now takes approx. 2 minutes
for the flow-controller to warm up.
-
Use the up and down
arrows to select the display showing FLOW and SETP as indicated in
the figure
-
Press ENTER and use
the arrow-buttons to adjust the setpoint for the flow of argon gas
through the ion source. A gas-flow between 1 sccm and 2 sccm is
recommended.
-
Press ENTER to exit
the editing modus
-
When the Power has
been switched on for at least 2 minutes (see step 2), press ON to
activate the flow-controller. The red SETPOINT LED will light up.
-
Open the valve
between the flow-controller and the ion-source slowly. When the valve
is fully opened, the pressure inside the vacuum chamber will be about
10-5 mBar.
-
On the front panel
of the power-supply for the ion-source, turn the POWER switch to the
on position. An audio alarm will sound and the unit will perform a
self-test.
-
Set the MODE switch
to LOCAL
-
Adjust the Beam
Current by selecting BEAM with the MODULE switch and CURRENT with the
FUNCTION switch. Enter the value by turning the ADJUST knob.
-
Adjust the Beam
Voltage by selecting BEAM with the MODULE switch and VOLTAGE with the
FUNCTION switch. Enter the value by turning the ADJUST knob.
-
Adjust the
Accelerator Voltage by selecting ACCELERATOR with the MODULE switch
and VOLTAGE with the FUNCTION switch. Enter the value by turning the
ADJUST knob.
-
Press the SOURCE
switch to start the gas-discharge inside the ion-source. Wait until
the discharge voltage is stable on 38 V and a stable discharge
current is indicated. A plasma is generated inside the ion-source and
the source is ready for extracting an ion beam now.
-
Press the BEAM
switch to apply a voltage to the beam extraction grids. This will
switch on the ion-beam. By rotating the transfer rod to 90°, the
sample faces the ion source and the etching-process will start.
-
To switch off the
ion-beam, press the SOURCE button. This will stop the ion-beam and
the discharge.
-
Close the valve
between the ion-source and the flow-controller.
-
Press OFF on the
front panel of the power-supply for the flow-controller to switch off
the setpoint. The SETPOINT LED will stop to light. The power-supply
for the flow-controller should be left on, for optimal performance.
|
Additional
remarks:
The ion-source should
always be operated in LOCAL mode.
If the cathode filament
current and neutralizer filament current need to be adjusted, go to
MANUAL mode, adjust the filament currents and go back to LOCAL mode
before starting the discharge.
The energy of the ions
in the ion-beam is dependent only on the beam voltage.
The accelerator voltage
should be adjusted to give a minimal accelerator current. A high
accelerator current results in a faster wear of the accelerator grid.
When the ratio of the
accelerator current and the beam current (A/B ratio) exceeds the
programmed limit (20%), an audio alarm will sound and an E25 error
message will appear on the Accelerator Current display. The current
and voltage settings or the gas flow have to be adjusted to decrease
the A/B ratio.
The Cathode filament
current and the Neutralizer filament current should not be increased
above 3 A.
The discharge voltage should always be 38 V.
Typical settings:
Pressure should be in the 10-5 range for a gas-flow of
2 sccm.
Cathode
Filament
Current
| Discharge
Current
| Beam
Current
| Accelerator
Current
| Neutralizer
Emission
Current
| Probe
|
| 2.75 A
| c:a 0.16
| 10 mA
| c:a 0 (zero)
| c:a 12 mA
|
|
|
| Discharge
Voltage
| Beam
Voltage
| Accelerator
Voltage
| Filament
Current
|
|
|
| 38.0 V
| 250 V
| 350 V
| 2.10 A
|
|
Measured
etch-rates:
|
Beam Voltage | Beam Current | Accelerator Voltage | Gas Flow | Etch Rate
|
| 75 V | 4 mA | 290 V | 2 sccm | 0.3 nm/min (Au)
|
| 250 V | 5 mA | 200 V | 1 sccm | 4.0 nm/min (Au)
|
| 250 V | 5 mA | 200 V | 1 sccm | 0.3 nm/min (C)
|
| 250 V | 5 mA | 200 V | 1 sccm | 1.3 nm/min (Al)
|
Change in settings, 2009-09-16:
Pressure should be in the 10-5 range for a gas-flow of
2 sccm.
Cathode
Filament
Current
| Discharge
Current
| Beam
Current
| Accelerator
Current
| Neutralizer
Emission
Current
| Probe
|
| 2.70 A
| c:a 0.25
| 14 mA
| 1 mA
| 17 mA
|
|
|
| Discharge
Voltage
| Beam
Voltage
| Accelerator
Voltage
| Filament
Current
|
|
|
| 38.0 V
| 250 V
| 350 V
| 1.64 A
|
|
Sven Katterwe, Condensed Matter Physics, SU,
Anders Liljeborg
Nanostructure Physics, KTH.


