Probe Handling
CAUTION: The probes are stored tip-side-up, and silicon is very brittle. The cantilever will break off of the substrate if contacted.
For help choosing the probe that's right for your application, see Probe Selection.
In order to use the probe for AFM imaging, you must mount it in the appropriate Probe Holder.
Use care when handling AFM probes. They should be picked up only with tweezers. Take care to grasp the probe with the tweezers on the longer sides of the rectangular substrate to avoid contacting the cantilever(s).
Probe Tool Kit
A tool kit for working with silicon probe substrates is included with the Dimension Icon system. The kit contains the following:
- Wafer tweezers
- Flat, substrate tweezers
- Regular tweezers
- Curved, sharp-pointed tweezers
- Flat, L-shaped tweezers
To Remove a Probe from a Wafer:
Most probes are now sold on a GEL-PAK and do not need to be separated from a waver. Should you have to remove d substrates from a wafer, the procedure is given below.
The procedure for removing individual substrates from the wafer is the same for both silicon and silicon nitride substrates. It is easier to accomplish this task with the aid of a stereo microscope with 50–70x magnification.
- View the wafer with an optical microscope to determine the orientation of the probe substrates and to inspect the cantilevers themselves.
NOTE: A 10–70x stereo microscope is useful for this task. The cantilevers are tip-side up when viewed in the wafer holder.
- Disconnect the substrate from the bulk of the wafer by pressing down gently on the non-cantilever end of the substrate or using sharp-pointed tweezers to carefully break the two substrate supporting arms connecting the substrate to the silicon wafer frame (see figure 1, below).
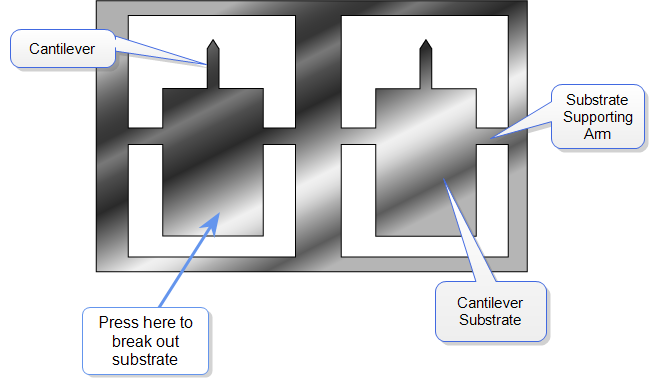
Figure 1: Silicon probe substrates in wafer
NOTE: The supporting arms connecting the substrate to the bulk of the wafer shatter when pressure is applied. It may be convenient to break several substrates from the wafer at one time. Extras may be safely stored in a specially prepared petri dish.
NOTE: Silicon nitride (SiN) substrates have two cantilevers on each end of the substrate. Both 100 and 200 µm-length cantilevers with two different leg widths are provided. When ready to use a probe, you may remove the unused cantilevers from the substrate, but it is not necessary. For most applications use the 200 µm cantilever with the wider legs. For atomic scale images, the 100 µm triangular cantilever with the wider legs yields good results.
- At the bottom of the petri dish, place X4-grade, GEL-PAK adhesive strips.
HINT: If GEL-PAK adhesive strips cannot be found, a simple substitute is the adhesive area from a Post-it note.
- Place the substrates, tips facing up, on the adhesive to permit easy removal of the substrates when needed. Cover the petri dish when not in use.
- Use the curved, sharp-pointed tweezers to remove the cantilever substrate from the wafer container, grasping the sides of the substrate away from the lever and probe tip. It may be helpful to tip the substrate to one side to help grasp it in the tweezers.
 Related Topics
| www.bruker.com
|
Bruker Corporation |
| www.brukerafmprobes.com
|
112 Robin Hill Rd. |
| nanoscaleworld.bruker-axs.com/nanoscaleworld/
|
Santa Barbara, CA 93117 |
| |
|
| |
Customer Support: (800) 873-9750 |
| |
Copyright 2010, 2011. All Rights Reserved. |
Open topic with navigation