Lysozyme on Mica—A Model Procedure for Protein Binding
Protein Binding Theory
All proteins contain free amino groups that become positively charged at sufficiently low pH. If sufficient free amino groups are located on the outside surface of the protein the protein will bind to a negatively charged mica surface. Proteins will become positively charged at pH below their isoelectric point. The protein lysozyme, for example, becomes sufficiently positively charged to bind to mica at pH 6. This is shown schematically below:
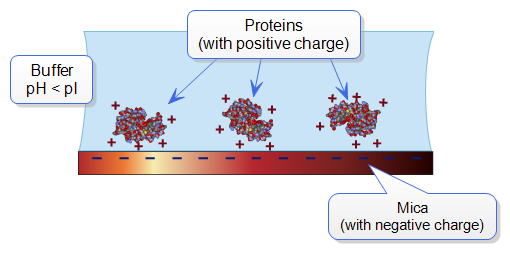
Figure 1: Proteins will typically bind to negatively charged mica when the pH is reduced below the protein’s isoelectric point, pI
Protein Binding Procedure
The following section gives a detailed procedure for preparing and imaging the protein lysozyme by TappingMode in fluid. The procedure was kindly provided by Monika Fritz at the University of California, Santa Barbara and is described in Radmacher, M., M. Fritz, H.G. Hansma, P.K. Hansma (1994). “Direct Observation of Enzyme Activity with Atomic Force Microscopy.” Science 265, 1577.
- Obtain the required materials:
- Deionized water
- Mica substrates
- Lysozyme protein L-6876 from Sigma Chemical
- Phosphate buffer solution, 10 mM KH2PO4, 150 mM KCl, pH 6 (buffer may be adjusted for other proteins)
- Tapping Mode Fluid Cell, Model MTFML
- Cantilevers (Oxide-Sharpened Silicon Nitride tips, Model NP-S, work well)
- Source of filtered (0.2 mm), compressed air or dry nitrogen
- UV lamp, high-intensity; Oriel Mod. 6035 pencil-style spectral calibration lamp or equivalent (optional for cantilever cleaning).
- Syringes: (1) 1 cc; (2) 5 cc; Micropipettes
- Fluid cell liquid lines (silicone tubing and fittings)
- Fluid cell o-ring (optional, see Method 1 in the section on Fluid Imaging).
- Tubing clamps (for liquid lines).
- Filter paper
- Dissolve the lysozyme in phosphate-buffered saline (PBS) solution to a concentration of 1 µg/mL (this concentration provides a convenient coverage for AFM imaging and may be used for a variety of similarly-sized samples).
- Draw the protein solution into a clean, 1 cc syringe and cap the syringe.
- Prepare a 5 cc syringe of buffer solution (without protein).
- Prepare the fluid cell for TappingMode in fluid operation.
- Clean the fluid cell and load a cantilever. For best results, clean the cantilever with UV light.
- Cleave a fresh mica surface by pressing adhesive tape against the top mica surface, then peeling off the tape.
- Deposit 50 µl of protein solution on the freshly cleaved mica.
- Allow 20–30 minutes for the protein solution to bind to the mica substrate. Binding time may vary with different samples. For longer binding times, put the mica in a covered dish with a wet piece of filter paper to keep the liquid from evaporating.
- Rinse the sample with a large quantity of buffer to remove unbound protein. Leave a drop of buffer on the mica.
- Mount the sample on the scanner end cap. Seal the fluid cell and fill with buffer.
- After the fluid cell has been flushed with buffer solution, reclamp the drain line. This is important for low-noise, low drift imaging. The sample is now ready for TappingMode imaging. A good TappingMode image of lysozyme protein on mica is shown in Figure 2:
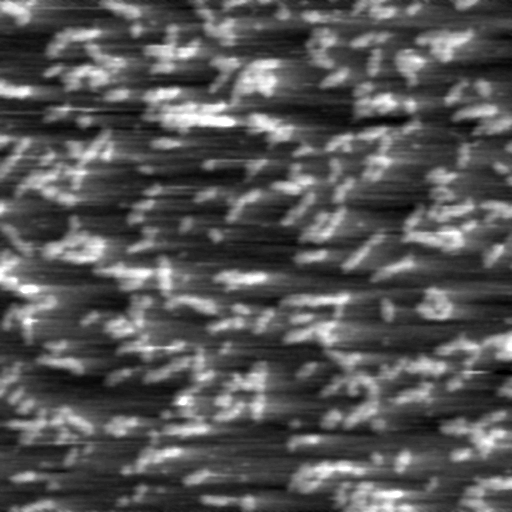
Figure 2: Tapping mode image of lysozyme in buffer solution using above sample preparation (Scan size = 500 nm).
NOTE: It is also possible to prepare samples inside the fluid cell by flowing the protein solution through the fluid cell. In this case, it may be helpful to engage the tip in Contact Mode with a zero Scan size to protect proteins from binding to the tip.
 Related Topics
| www.bruker.com
|
Bruker Corporation |
| www.brukerafmprobes.com
|
112 Robin Hill Rd. |
| nanoscaleworld.bruker-axs.com/nanoscaleworld/
|
Santa Barbara, CA 93117 |
| |
|
| |
Customer Support: (800) 873-9750 |
| |
Copyright 2010, 2011. All Rights Reserved. |
Open topic with navigation