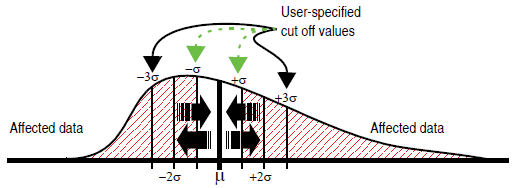
Figure 1: Cutoff Values Depiction
|
Figure 2: Select Clean Image from the Workspace
Or
Or
Or |
|
![]() |
Click the Clean Image icon in the toolbar. |
A separate window opens, also displaying the image. Right-click in the image to display the Clean Image options menu (see Figure 3). |
|
|
To restore the unprocessed image, click the Reload button. |
|
Figure 4 shows the image of Figure 3 after a clean operation with Spike and Streak cutoff both set to 0.5σ. |
Figure 4: Image of Figure 3 after a 0.5σ clean operation
Parameter | Description |
---|---|
Settings:
|
|
Settings:
|
|
Number of sigma values to use as the cut off point for spike data. Data points lying outside the mean ± Spike cut off sigma value(s) are replaced by the mean data value. Range:
|
|
Number of sigma values to use as the cut off point for streak data. Data points lying outside the mean ± Streak cut off sigma value(s) are replaced by the mean data value. Range:
|
|
Output File Name |
Select the path of the extracted image file. Leave blank for immediate view/use without saving the altered image file. |
Write File Upon Execute |
Writes the output file(s) when the Execute button is clicked. |
Table 1: Clean Image Parameters
Parameter | Description |
---|---|
Execute |
Initiates the Clean Image command. |
Reload |
Restores the image to its original form by reloading the original file. |
Table 2: Buttons on the Clean Image Panel
www.bruker.com | Bruker Corporation |
www.brukerafmprobes.com | 112 Robin Hill Rd. |
nanoscaleworld.bruker-axs.com/nanoscaleworld/ | Santa Barbara, CA 93117 |
Customer Support: (800) 873-9750 | |
Copyright 2010, 2011. All Rights Reserved. |