You are here: NanoScope Software User Guide > Offline Commands > Modify Commands > Subtract Image

Subtract Image

The Subtract Image command enables data from one image to be subtracted from another image. This proves most useful when comparing two or more images from a surface to determine changes over time, or to compare completely different images.
 
NOTE: Subtract Image operations cannot be directly applied to images having different pixel sizes (Number of Samples value). For example, a 256 x 256 pixel image cannot be directly subtracted from a 512 x 512 image.
 

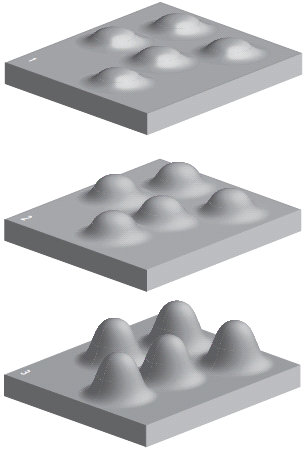
Figure 1 diagrams an image subtraction and its effects. Surface 2, when subtracted from surface 3, yields surface 1 (“3” – “2” = “1”). Conversely, surface 1 plus surface 2 yields surface 3 (“1” + “2” = “3”).

Figure 1: Subtract Image Depiction

Subtract Image Procedure

 
  1. Select an image file from the file browsing window at the right of the main window Double click the thumbnail image to select and open the image.
  2. You can open the Subtract Image view, shown in , using one of the following methods:
    • Right-click on the image name in the Workspace and select Add View > Subtract Image from the popup menu. See Figure 2.

Figure 2: Select Subtract Image from the Workspace.


Or

  • Right-click on a thumbnail in the Multiple Channel window and select Subtract Image.

Or

  • Select Modify > Subtract Imagefrom the menu bar.

Or

  1. Click the Subtract Image icon in the toolbar.
 
  1. The Subtract Image view, shown in Figure 3, opens.

Figure 3: Subtract Image view—single monitor

 
  1. Select a file to subtract from the Inputs > Image to Subtract menu or click the Load Image button to browse for a file.
  2. If necessary, right click in either panel to change the channel. See Figure 3.
  3. Click the Subtract Image button to subtract the image in the right panel from the image in the left pane. The result, which overrides the data in the active channel, is shown (see Figure 4) in the left panel of the Subtract Image view.
NOTE: When Data types are not the same, the calculation is performed as follows:
First Image Relative Z scale * first (left) image - Second image Relative Z scale * second (right) image = new image. The Relative Z scale must be greater than - 32767 and less than 32767.
  1. Click Undo to restore the originally loaded file.

Figure 4: Subtract Image after Channel 2 (right) was subtracted from Channel 1.


www.bruker.com Bruker Corporation
www.brukerafmprobes.com 112 Robin Hill Rd.
nanoscaleworld.bruker-axs.com/nanoscaleworld/ Santa Barbara, CA 93117
   
  Customer Support: (800) 873-9750
  Copyright 2010, 2011. All Rights Reserved.