Edwards HV depostioning system
Revised 2006-11-15, Anders Holmberg
Revised 2011-01-19, Anders Liljeborg
Revised 2018-01-02, Anders Liljeborg
Operation of the Edwards Deposition System
The following guide helps you through the use of the Edwards deposition
system. There are no notes here about different faults that can occur
during use, refer to your own notes or contact system responsible if
there are unknown problems.
Start-up of the system
At the start of your session, the system should already be on and the
display on the AUTO306 Controller shows FINE PUMPING. You can then go
ahead with the Loading procedure.
The main power to the system can be turned on/off by the I/0
button the the left of the touch screen of
the Auto306 Controller unit. Normally it should always be on. If the
system is shut down, please contact the responsible person.
Loading procedure
-
The AUTO306 Controller display should show SEALED or FINE
PUMPING. Press the Seal button and then the Vent button on the
controller. The Controller display will then show CHAMBER VENT.
-
Wait until the Controller display shows SEALED, do not force open the
chamber door before sealed is shown. Open the door and load substrates
and so forth into the chamber. Change the cover glasses over the
view-port if necessary. Rotate the crucible holder to the right
material position and check so there are no foreign particles or metal
flakes on the metal lump. Then close the chamber.
-
Press the Process button on the Controller. The Controller display
will then show ROUGHING, PUMP DOWN, and finally FINE PUMPING.
-
Fill up the liquid Nitrogen trap and wait for process vacuum. The pump
down time depends on the room humidity, the time the chamber door was
open during loading, contamination degree of samples and
chamber. Normally, the system pumps down to 4×10⁻⁶ mBar within 50
minutes.
-
Start making notes in the Log Book. Follow the note structure of
earlier depositions!
Deposit materials
-
Recheck that you have chosen the right material for deposition. Choose
the proper layer on the Film Thickness Monitor.
-
Make sure you have achieved at least 8×10⁻⁶ mBar.
Note the pressure
value you have in the Log Book as Pini.
-
Switch on the High Voltage Electron Beam Power Supply. The three green
lamps on the Electron Beam Power Supply should go on.
-
Turn the Sweep Control Unit 'on/off' switch to on. Adjust the X- and
Y-Amplitude controls to proper values for your material.
-
Check that the 'Current control' knob is at its 'min' position. Press
the 'on/off' button on the Source Control to on. The fans in the
Electron Beam Power Supply should start (you should hear this) and
this is also indicated by the yellow lamp on the Electron Beam Power
Supply. After a short delay, the power LED on the Source Control
should go on.
-
Recheck that the 'Current control' knob is at its 'min'
position. Then, press 'Gun' button on the EB3 Source Control to on.
-
Start heating the filament very, very slowly until the filament glows
up in the chamber, and the Ammeter jumps from 0 to 3 mA. It should
take ~10 s to do the turn from 'min' value on the current knob, to the
position when the Ammeter shows 3 mA. Wait an additional 10 s.
-
Make sure that the shutter is closed. Heat up the material by slowly
increasing the current. Look through the viewing port onto the
material and make sure that the material is heating up, as it should,
while you are increasing the current. Readjust the sweep amplitude if
this is required for the specific material.
When you have reached the
right current, note the pressure in the Log Book as Psta.
Wait until the rate is > 0.
-
Put your samples into rotation if you intend to do so. Start
deposition by removing the shutter, and pressing 'open shutter' button
on the Film Thickness Monitor simultaneously.
Note the current and the
deposition rate in the Log Book.
OBSERVE! Do not leave the system by it self for longer time during the
deposition (so you can stop if something goes wrong).
-
When the right thickness is indicated on the Film Thickness Monitor,
close the shutter, turn the filament current down to 0, press the
'Gun' button to off, and switch the Sweep Control Unit 'on/off' switch to
off.
-
Wait 3 min to allow the metal to cool down. Then press the 'on/off'
button on the EB3 Source Control to off. Switch the High voltage
Electron Beam Power Supply off. You are now ready to unload your
samples.
Unload procedure
-
Press the Seal button and then the Vent button on the AUTO306
Controller. The display will then show CHAMBER VENT.
-
Wait until the Controller display shows SEALED, do not force open the
door before sealed is shown. Unload your samples and close the chamber
door.
-
Press the Process button on the Controller. The Controller display
will then show ROUGHING, PUMP DOWN, and finally FINE PUMPING.
Do not leave the system vented for longer time then
necessary. Exposing the chamber to air for a long time will increase
the pump down time.
Shut down of the system, only for service
The system
should be left under vacuum as much as possible. That means it should
be left in Fine Pumping when you are done with your session.
The system should be shut down for service only!
-
Make sure that the display on the AUTO306 Controller shows FINE
PUMPING and that the pressure is down to at least 9.9×10⁻⁵ mBar.
-
Press the seal button, then the stop button. The AUTO306 Controller
display shows TURBO STOP and then STANDBY.
Start up of system, after service
After a service shutdown (all power off) the sequence for starting is
like this:
- Connect all power cables, one for the Auto 306 and one (3-phase)
for the E-gun power supply, separate box.
- Press power on switch.
- Press "Reset" switch.
- Press "Start" on controller touch panel.
- Wait for turbo to reach speed
- Press "Process"
- The pump down should start and the display should read (in
sequence):
- Roughing
- Pumpdown
- Fine pumping
- The vacuum should go down to about 10-5 mBar after
about 5 - 10 minutes.
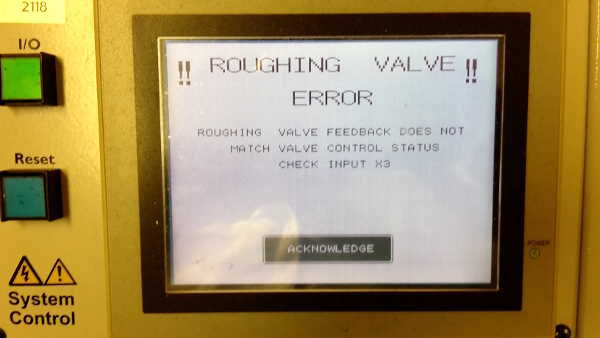
Warning!
When starting pump down it is absolutely neccessary to have both front
and back doors closed. There are sensor switches to both doors.
Otherwies an error occurs and the pump down stops, backing pump is
shut off. As you can see, the error text is not very helpful.
Anders Holmberg, Anders Liljeborg
Nanostructure Physics, KTH.