Karl Süss MJB3 mask aligner, operating procedure

START-UP

Start the machine 30 minutes before use.
  1. Turn on the green pump in the service corridor.
  2. Turn on the switches for air pressure and nitrogen on the mask aligner.
  3. Check that the manometers are giving the correct pressures.
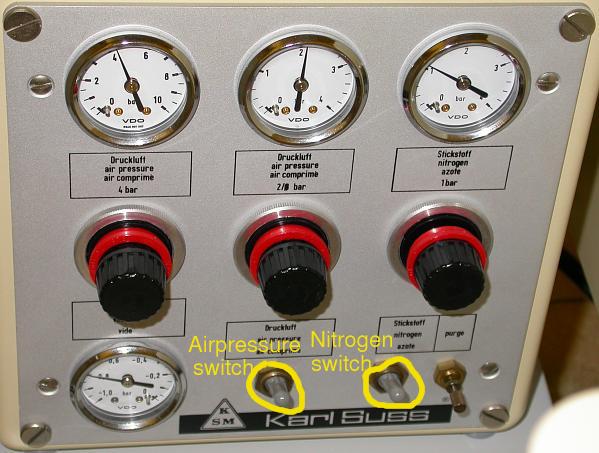
    They should be about 4 bars, 2 bars and 1 bar from left to right.
  4. Turn on H2 (H1 should already be on).
  5. Light up the mercury lamp by turning the switch on the Hg-lamp power supply to its "ON" position.
  6. Wait until "RDY" is shown on the display and then press "Start". Display blinks "COLD" at first, then it shows power.
    Blue light should be leaking out from the lamp house.

    Select CP for constant power operation, most stable operation.

    (Obsolete: Make sure CI2 is selected.)
  7. Press the power button on the mask panel control.
  8. Turn on the lamp for the microscope.

Mask loading

Please note: Maximum mask size 100 mm (4 inch)
Maximum substrate size 63 mm (2.5 inch)

Sample loading, alignment and exposure

Turn off the mask aligner

  1. Unload the mask: Loosen the screws of the mask holder and place the mask on the table facing you.
    Press "VACUUM MASK" to unfasten the mask in the holder.
    PUT THE MASK HOLDER back to its place.
  2. Turn off the microscope lamp
  3. Turn off the mask power
  4. Turn off the Hg-lamp power supply.
  5. Switch off H2
  6. Turn off the green vacuum pump on the floor beside the system.
  7. LET THE N2 FLOW FOR 15-20 MIN
  8. Switch off the air and nitrogen pressure switches.

    Exposure modes


    Vacuum Contact (HP mode): In the HP (High Precsision) program a vacuum is drawn between the mask and the wafer prior exposure. This mode allows the highest resolution since the gap between the mask and wafer is minimized.

       How to use it:

    Standard (ST) Hard contact mode: During exposure, the vacuum holding the substrate to the chuck is switched off and positive nitrogen pressure is used to press the substrate against the mask.

       How to use it:

    Soft Contact mode: When the ST and soft contact buttons are illuminated simultaneously, the soft contact mode is selected and the substrate is held to the mask just by mechanical pressure of chuck throughout the exposure. The vacuum holding the substrate to the chuck remains on.

    How to use it:

    Proximity contact: Exposures are made with a small gap between the mask and substrate. The gap is determined by the height adjustment.

    How to use it:

    Height Adjustment

    It should be done when a new mask or sample thickness is going to be used.
    Do it without resist on your sample.

    NEVER ADJUST THE THICKNESS WHEN CONTACT IS ON.

    1. Press soft contact mode.
    2. GO TO CONTACT, check if the sample is in contact (You will see if it "twists" when you move the contact arm slowly up)
    3. If not, go back to full separation
    4. Move the z-knob ½ turn
    5. Repeat 1, 2 and 3 until you get contact.
    6. Go to half contact position and turn the knob 1.5 revolutions.

    Carlota Canalias, Anders Liljeborg Nanostructure Physics, KTH.