Heater/Cooler Troubleshooting and Maintenance
Fuse Replacement
If nothing happens after turning on the Thermal Applications Controller, check the fuse located in the rear of the unit. To check the fuse:
- Unplug the controller from the AC power supply.
- Using a small screwdriver, open the fuse box cover from the top and remove the fuse holder from the main fuse compartment.
- Remove the fuse that looks damaged.
- Check the fuse with an ohmmeter. The reading is less than 0.5 ohms if the fuse is OK. Check the second fuse if the first one selected is undamaged.
- Replace the blown fuse with an undamaged 250 V rated fuse and press the cap/fuse holder back onto the main fuse compartment. The fuse rating for 100–120 V is 2.5 A and the rating for 220–240 V is 1.25 A.
If the heater or heater/cooler is not functioning properly, contact Bruker.
Pump Tube Replacement
If the cooling pump fails to draw water, the persitaltic pump tube inside the cooling pump housing may have become blocked, pinched or leaky. The persitaltic pump tube is a consumable component and may be replaced by ordering Cole-Parmer Silicone Tubing (Peroxide Cured), 25 Feet, Size 16 Tubing, part number 96400-16, at www.ColeParmer.com. The peristaltic pump works by squeezing the outside of the tube to move the contents within the tube. With the persitaltic pump tube in place, but the pump turned off for a prolonged time, the tube may become permanently deformed in a constricting configuration, hindering flow when the pump is started again. After prolonged use, the peristaltic tube may also wear and leak.
To replace the persitaltic pump tube:
- Using a flat blade screwdriver, remove the four cap screws which hold the cooling pump end bells to the pump motor.
- Separate the end bells and gently pull the peristaltic pump tube free of the pump.
- Inspect the tube for pinching/blockage. Massage the tube to attempt to restore its shape.
- If the tube recovers functionality, reinstall it on the pump, rotating the tube relative to its former position to prevent recollapse of the same area.
- If the tube cannot be reused, cut a new 15” (38 cm) length from the tubing supply and, following the instructions in the Masterflex L/S Standard Pump Head manual, install it in the pump. Install the pump cover and secure it with the screws removed in step 1.
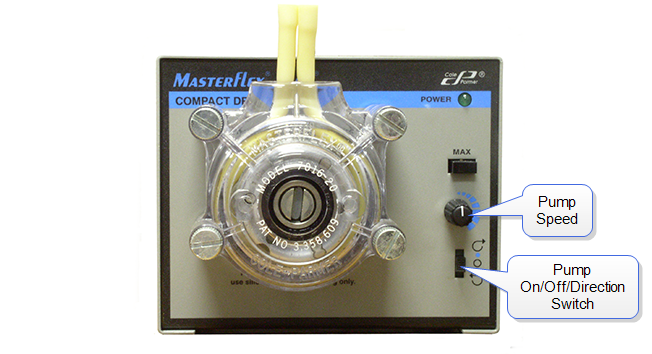
Figure 1: Masterflex L/S Pump Drive and Head
Tube Replacement
Replace the silicone tubing between the pump and the scanner if it has yellowed, appears dirty or is leaking.
Emptying the Cooling System
You may wish to empty the cooling system if it will be unused for a period of time (e.g. several days). To do this:
- Turn off the pump.
- Unplug the pump quick-disconnect fitting on top of the fluid reservoir. This disconnects fluid input to the pump.
- Unplug the silicone tube from the pump quick-disconnect fitting to allow air to enter the pump. The check valve in the quick-disconnect fitting is closed when not connected.
- Vent the reservoir by removing the (larger diameter) tubing from the pressure relief port (unlabeled) on the fluid reservoir.
NOTE: Do not remove the quick-disconnect fitting from this port. Removing a quick-disconnect fitting closes a check valve causing the reservoir not to be vented to atmosphere.
- Turn on the pump, in the same direction as before, so that it is pushing coolant into the reservoir. Because the silicone tube has been disconnected from the Pump side of the reservoir, the pump will no longer pull coolant from the reservoir. Increase the pump speed to 1/4 of the full, clockwise, range to speed up the purging process.
- Turn off the pump after verifying that all fluid has been pumped from the tubing.
- To empty the pulse damper completely, tilt the pulse damper placing the input side above the output side, removing the remaining coolant. Return the pulse damper to a level position and, if necessary, repeat.
| www.bruker.com
|
Bruker Corporation |
| www.brukerafmprobes.com
|
112 Robin Hill Rd. |
| nanoscaleworld.bruker-axs.com/nanoscaleworld/
|
Santa Barbara, CA 93117 |
| |
|
| |
Customer Support: (800) 873-9750 |
| |
Copyright 2010, 2011. All Rights Reserved. |
Open topic with navigation