Creating an AutoProgram
Do the following to create an AutoProgram:

|
- Select a directory, then an image file within it, from the file browsing window at the right of the NanoScope main window. Double-click its thumbnail to select and open the image. The image file name and the Offline icon, as well as a Multiple Channel icon and the words Multiple Channel are added to the Workflow Toolbar (Workspace), and the image opens in the viewing window, shown in Figure 1.
|
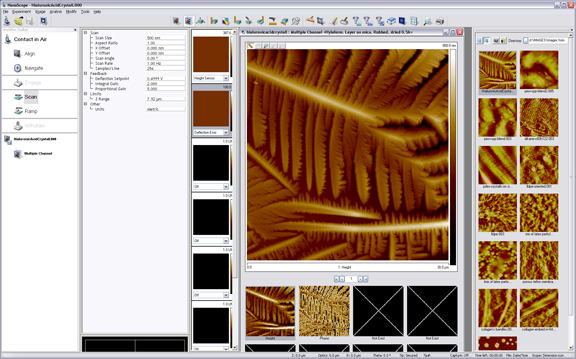
Figure 1: Open Image
| |
- In the The Workflow Toolbar, right-click on the image file name or its Offline icon and select Create AutoProgram (see Figure 2). You may also right-click on the Multiple Channel icon or Multiple Channel and select Create AutoProgram.
|
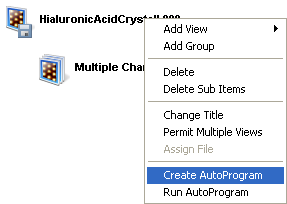
Figure 2: Create AutoProgram
| |
- You are asked if you want to include the selected image to define the AutoProgram among the images processed by the AutoProgram (see Figure 3). (Typically: Yes.) The Add Linked box should also be checked. When linking, any changes made to the currently active view will then alter any linked views.
|
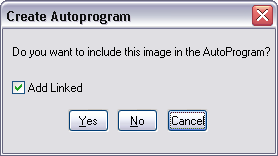
Figure 3: Include Selected Image window
| |
- In the AutoProgram Results View (see Figure 4):
- Right-click on AutoProgram, under the file name or icon appearing on the line under Run Group.
- Click Add View to add a view to the AutoProgram. This view will then be added to all files in the AutoProgram if they are linked.
- Click the view of an Offline command to be performed first by the AutoProgram.
- Repeat for additional views.
NOTE: Example specifications of the Flatten, Depth and Roughness commands for inclusion in an AutoProgram are described next. Similar actions apply to include other Offline commands in an AutoProgram.
|
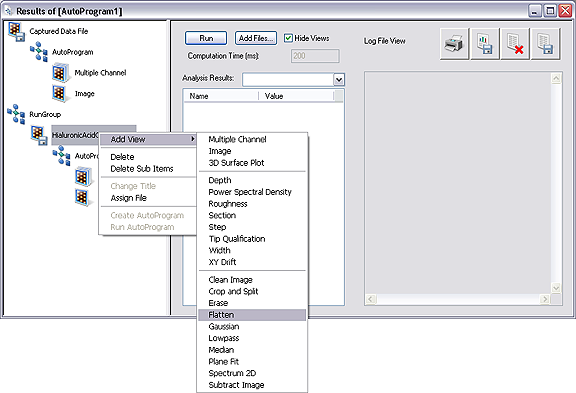
Figure 4: Add Views to be Included in an AutoProgram
| www.bruker.com
|
Bruker Corporation |
| www.brukerafmprobes.com
|
112 Robin Hill Rd. |
| nanoscaleworld.bruker-axs.com/nanoscaleworld/
|
Santa Barbara, CA 93117 |
| |
|
| |
Customer Support: (800) 873-9750 |
| |
Copyright 2010, 2011. All Rights Reserved. |
Open topic with navigation