Common Image Control Actions
Right-Clicking in the Image Window
Right-clicking in the Image window, but not on the image (see Right Clicking On an Image), shown in Figure 1, allows you to perform the following tasks:
- Note—Adds notes to an image file.
- All Channels—When checked, the All Channels button displays all captured data channels.
- Export View—Exports the current view as a jpeg image.
- Copy View—Copies the current view to the clipboard.
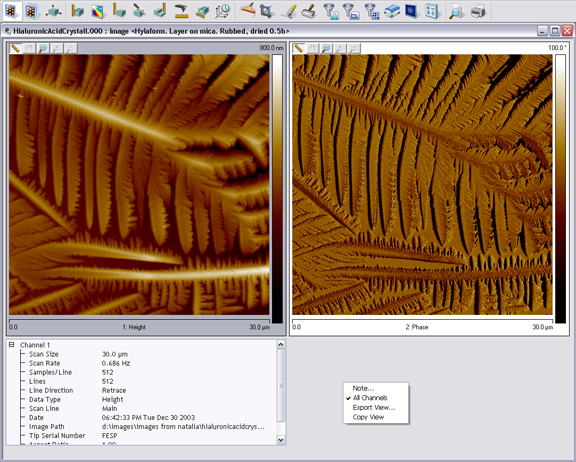
Figure 1: Depiction of right-clicking on an image window
Right Clicking On an Image
Right-clicking on an image will open a menu shown in Figure 2.
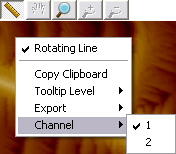
Figure 2: Depiction of Dialog when Image is right-clicked
The following tasks are available by right clicking on an image:
- Rotating Line— Left click, hold, and drag out a line. Release the mouse button to end the line.
- Box (for some analyses)— Left click, hold, and drag out a box and release the mouse button.
- Copy Clipboard—copies the image to the Microsoft clipboard.
- Tooltip Level :
- Basic
- Medium
- Advanced
- None
- Export - Exports the image as a bitmap
- Channel—Selects which channel is displayed.
NOTE: Left clicking in the center of the box allows you to translate. Left clicking on edges allows you to change the box size.
Image Buttons
Clicking the Image buttons above a captured image perform the following functions:
- Measure—Left click, hold, and drag out a line. The length of the line appears in a box near the line anytime the cursor is on the line.
- Pan—From a zoomed image, pan around to other areas of the original image.
- Data Zoom—Left click, hold, and drag out a box. Release the mouse button and the image will automatically zoom in to the area of the box. The zoomed region will be centered about the point originally selected.
- Resize Up—Resizes the image up to the precious zoom level.
- Resize Down—Resized the image down to the previous zoom level.
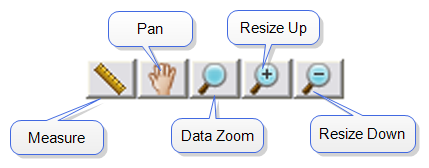
Figure 3: Image Buttons
Color Tables
The Color Scale page shows how to change the image appearance.
Using the Mouse Within a Captured Image
The following functions are available by using your mouse within a captured image:
- Left click anywhere in an image window, drag line out and release—Creates a line of X length, at θ° angle in the image window.
- Place cursor on line—Displays the length and angle values of line in the image window.
- Place cursor on line, click and hold left button, and drag—Allows you to drag the line anywhere in the image window.
- Click and hold either end of line and drag—Changes length and/or angle of the line.
- Right click—Clicking the right mouse button when the cursor is on the line accesses the Image Cursor menu.
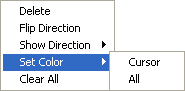
Figure 4: Image Cursor Menu
The Image Cursor menu enables the following functions:
- Delete — deletes the line.
- Flip Direction—switches the line end to end.
- Show Direction—Adds a small arrowhead to the line to indicate direction.
- Set Color—Allows you to change the color of the line.
- Clear All—Deletes all lines.
| www.bruker.com
|
Bruker Corporation |
| www.brukerafmprobes.com
|
112 Robin Hill Rd. |
| nanoscaleworld.bruker-axs.com/nanoscaleworld/
|
Santa Barbara, CA 93117 |
| |
|
| |
Customer Support: (800) 873-9750 |
| |
Copyright 2010, 2011. All Rights Reserved. |
Open topic with navigation