Teach a Real-time Recipe
- Create a basic outline of the recipe.
- Start the Recipe view by clicking Tools > Recipes in the NanoScope toolbar.
- Add a Real-time step using one of the following methods:
- Right-click on My Recipe in the Recipes window and click New > Real-time.
Or
- Click Edit > New > Real-time.
- Add an Alignment/Origin step using one of the following methods:
- Right-click on Real-time in the Recipes window and click New > Alignment/Origin.
Or
- Click Edit > New > Alignment/Origin.
- Add an Autotune step using one of the following methods:
- Right-click on Alignment/Origin in the Recipes window and click New > Autotune.
Or
- Click on Alignment/Origin and then click Edit > New > Autotune.
- Add a Site step using one of the following methods:
- Right-click on Alignment/Origin in the Recipes window and click New > Site.
Or
- Click on Alignment/Origin and then click Edit > New > Site.
- Add a Measurement step using one of the following methods:
- Right-click on Site in the Recipes window and click New > Measurement.
Or
- Click on Site and then click Edit > New > Measurement.
- Add a Capture Image step using one of the following methods:
- Right-click on Measurement in the Recipes window and click New > Capture Image.
Or
- Click on Measurement and then click Edit > New > Image Capture.
- Select File > Save Recipe As D:\Recipes\Example1.rcx. See Figure 1.
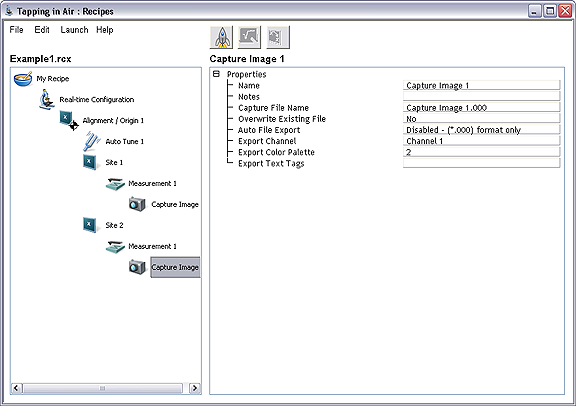
Figure 1: Example 1, Basic Outline
- Teach Alignment
- Open the Alignment Professor using one of the following methods:
- Right-click on Alignment/Origin in the Example1.rcx window and click Professor.
Or
- Click on Alignment/Origin and then click the Professor icon.
- Enter the relative stage speed and click Next.
- Select the Leave stage in current location radio button. Click Next.
- Select the Origin Only radio button. Click Next.
- The Professor then opens the Setup window. Even if the Setup window is in focus, the Professor will still appear over the window. Move the Professor window out of the way, and Align the Laser on the Probe tip. Proceed with focusing on the tip. Align the tip with the cross hair in a consistent repeatable fashion.
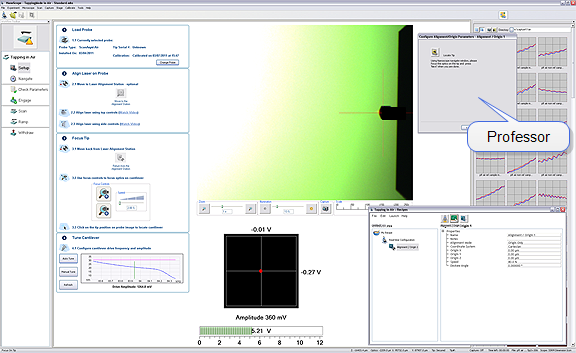
- After the tip is brought into focus and the cross hairs placed, click Next in the Configure Alignment/Origin Parameters (Professor) window. This opens the Navigate window.
- Adjust the Z Motor to Focus on the Sample, and move the XY stage to the proper location for the origin (Navigate to Scan Centerpoint.
- Click Next in the Alignment/Origin Professor box to continue.
- Click Finish to complete the parameter configuration. The XYZ coordinates will appear in the parameter list of the Alignment /Origin node.
- Set Auto Tune parameters.
- Click the Auto Tune step.
- Set the following properties (TESP probe, for example) in the Properties panel:
- Start Frequency: 0 kHz.
- End Frequency: 400 kHz.
- Target Amplitude: 500 mV.
- Peak Offset: 5.00%.
- Minimum Q: 0.
- Save the Recipe.
- Teach Site 1.
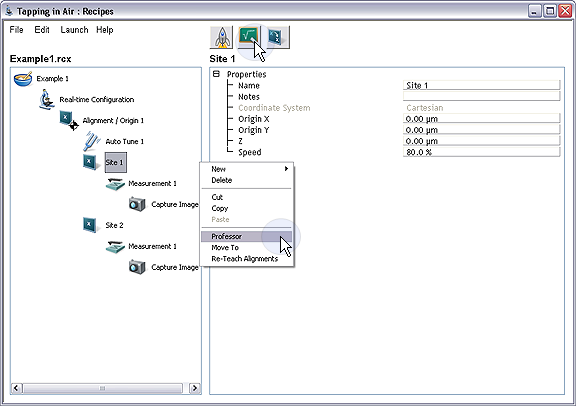
- Open the Site 1 Professor using one of the following methods:
- Right-click on Site 1 in the Example1.rcx window and click Professor.
Or
- Click on Site 1 and then click the Professor icon.
- Enter the relative stage speed and click Next.
- Select the Leave stage in current location radio button. Click Next.
- Using the Navigate buttons move the stage to the desired position. Click Next.
- Click Finish
- Set the Measurement parameters.
- Open the Measurement Professor using one of the following methods:
- Right-click on Measurement in the Example1.rcx window and click Professor.
Or
- Click on Measurement and then click the Professor icon.
- Select the Leave system in current state radio button. Click Next.
- Configure the scan parameters in the Scan Parameters window.
- Click Finish.
- Verify the parameters in the Properties list in the Professor.
- Set the Capture Image parameters.
- Click the Capture Image step.
- Set the following properties:
- Give a Capture File Name including an appropriate three digit extension. E.g. Site1Image.000.
- Select Yes for Overwrite Existing File.
- Auto File Export: Disabled.
- Save the Recipe.
- Set the default folders:
- Click the My Recipe step.
- Set the following properties:
- Capture Directory D:\Recipes\Example1.
- Report Directory D:\Recipes\Example1.
- Select File > Save Recipe.
Next:
Run the Real-time Recipe
Add an Additional Site
Teach an Offline Recipe
| www.bruker.com
|
Bruker Corporation |
| www.brukerafmprobes.com
|
112 Robin Hill Rd. |
| nanoscaleworld.bruker-axs.com/nanoscaleworld/
|
Santa Barbara, CA 93117 |
| |
|
| |
Customer Support: (800) 873-9750 |
| |
Copyright 2010, 2011. All Rights Reserved. |
Open topic with navigation