Teach an Offline Recipe
- Create a basic outline of the offline recipe.
- Add an Image Set step using one of the following methods:
- Right-click on My Recipe in the Example1.rcx window and click New > Image Set (offline).
Or
- Click on My Recipe and then click Edit > New > Image Set (offline).
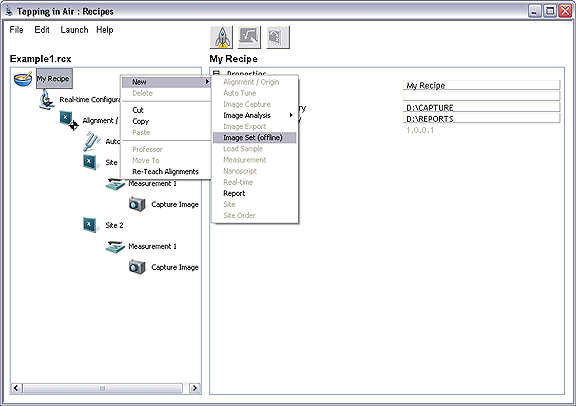
Figure 1: Add an Image Set
- Add a Flatten step using one of the following methods:
- Right-click on Image Set 1 in the Example1.rcx window and click New > Image Analysis > Flatten.
Or
- Click on Image Set 1 then click Edit > New > Image Analysis > Flatten.
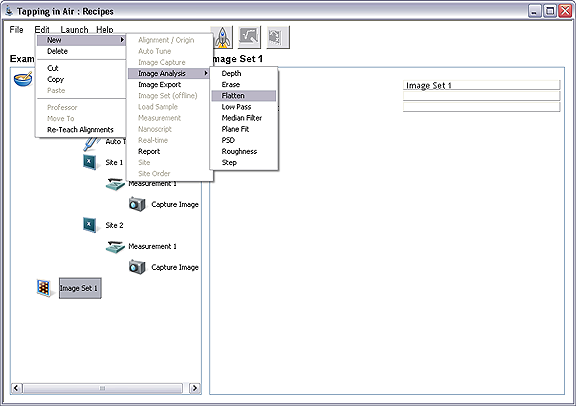
Figure 2: Add a Flatten step
- Add a Roughness step as a child of the Flatten step using one of the following methods:
- Right-click on Flatten in the Example1.rcx window and click New > Image Analysis > Roughness.
Or
- Click on Flatten then click Edit > New > Image Analysis > Roughness.
- Add a Report step as a child of the My Recipe step using one of the following methods:
- Right-click on My Recipe in the Example1.rcx window and click New > Report.
Or
- Click on My Recipe and then click Edit > New > Report.
- Create the Image List.
- Click on the "…" button to the right of the Image List field, which will open a window to help select files for the Image set.
- The Directory button allows you to browse to the folder where the stored images are located. Use the Add and Remove buttons to select files to add to the image list. See Figure 3.
NOTE: You may manually edit the Image List field in the Recipe window. This may be necessary to add files for images that do not exist when the recipe is written.
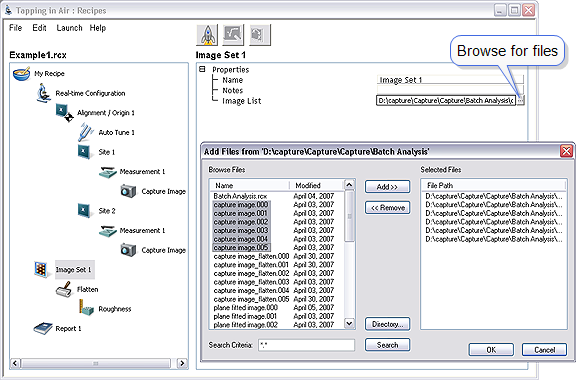
Figure 3: Add Files to the Image List
NOTE: The Selected Files panel displays links to file locations when the recipe was last saved. These links may no longer exist if the files have been moved. The Recipe Runner Log will display an error if the selected file was not found.
- Configure the Flatten step.
- Open the Flatten Professor using one of the following methods:
- Right-click on Flatten in the Example1.rcx window and click Professor.
Or
- Click on Flatten and then click the Professor icon.
- Make appropriate changes to the input parameters in the Flatten analysis window.
- Click Next.
- Click Finish.
- Configure the Roughness step.
- Open the Roughness Professor using one of the following methods:
- Right-click on Roughness in the Example1.rcx window and click Professor.
Or
- Click on Roughness and then click the Professor icon.
- Make appropriate changes to the input parameters in the Roughness analysis window. See Roughness for details.
- Click Next.
- Click Finish.
- Configure the Report step.
- Set the following properties:
- Name: Report1.
- Report Output XML File: D:\Recipes\Report1.
- Select File > Save Recipe.
Previous:
Teach a Real-time Recipe
Run the Real-time Recipe
Add an Additional Site
| www.bruker.com
|
Bruker Corporation |
| www.brukerafmprobes.com
|
112 Robin Hill Rd. |
| nanoscaleworld.bruker-axs.com/nanoscaleworld/
|
Santa Barbara, CA 93117 |
| |
|
| |
Customer Support: (800) 873-9750 |
| |
Copyright 2010, 2011. All Rights Reserved. |
Open topic with navigation